A chiller circuit sitting at zero pressure is one of the more awkward faults an engineer can find. The refrigerant has gone, so there is nothing left for a leak detector to pick up, yet UK F-Gas rules say the leak must be found and repaired as soon as possible. Here is how chiller leak repair works on an empty circuit, using a recent job on a 24/7 process chiller in Liverpool as a real example.
Signs a chiller has a refrigerant leak
- Suction and discharge pressures lower than normal, or falling over time
- Reduced cooling capacity, or chilled water temperatures creeping up
- Compressors short-cycling or tripping on low pressure
- Oil staining around joints, valves or coils, where oil has escaped with the refrigerant
- A circuit that has stopped altogether, with zero pressures and no compressor current
On a multi-circuit chiller, that last sign is easy to miss. The other circuits keep the water cool, so production carries on while the chiller runs with no spare capacity. That is exactly what our engineers found on a four-circuit process chiller during a routine visit, as described in our chiller PPM case study.
Why a leak detector cannot find a leak on an empty circuit
Electronic leak detectors work by sensing refrigerant in the air. When a circuit has lost its entire charge, there is no refrigerant left to sense. Putting refrigerant back in just to find the leak would mean releasing more of it into the atmosphere, which is exactly what the F-Gas rules are there to prevent. Instead, engineers use nitrogen.
Step 1: Pressure test with oxygen-free nitrogen
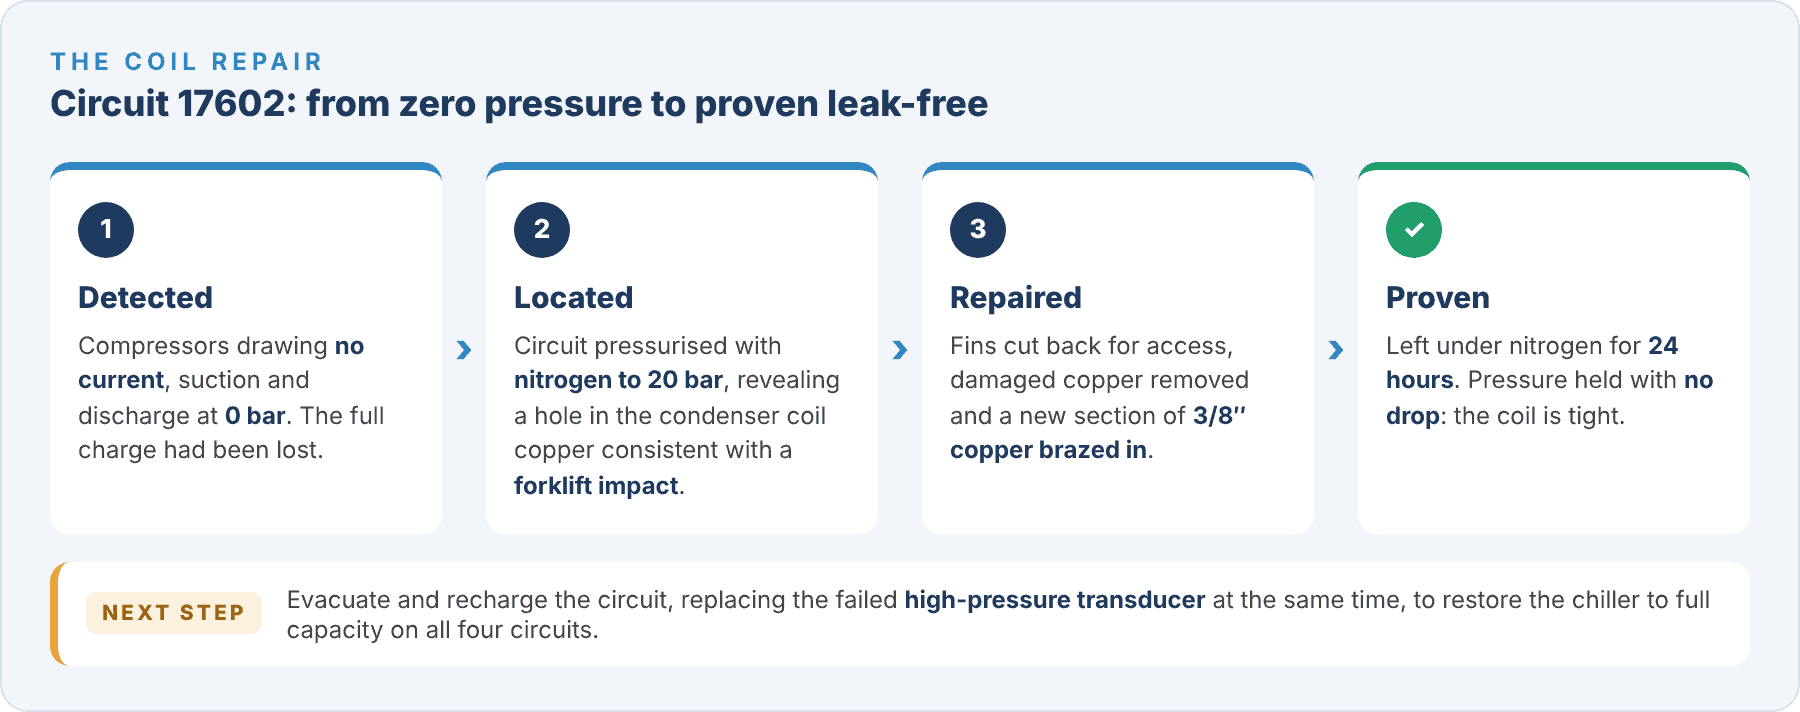
The empty circuit is filled with oxygen-free nitrogen (OFN). Nitrogen is dry and inert, so it will not react with the oil or leave moisture in the system, and it is safe to release once the test is over. The test pressure is chosen to stay within the system’s design limits. On the Liverpool chiller, our engineer pressurised the circuit to 20 bar.
Step 2: Pinpoint the leak
With the circuit under pressure, the engineer traces where the gas is escaping, typically using leak detection fluid, which bubbles at the leak, or by listening for escaping gas where the hole is larger. Joints, valves, coils and anywhere the pipework could rub or vibrate are the usual suspects.
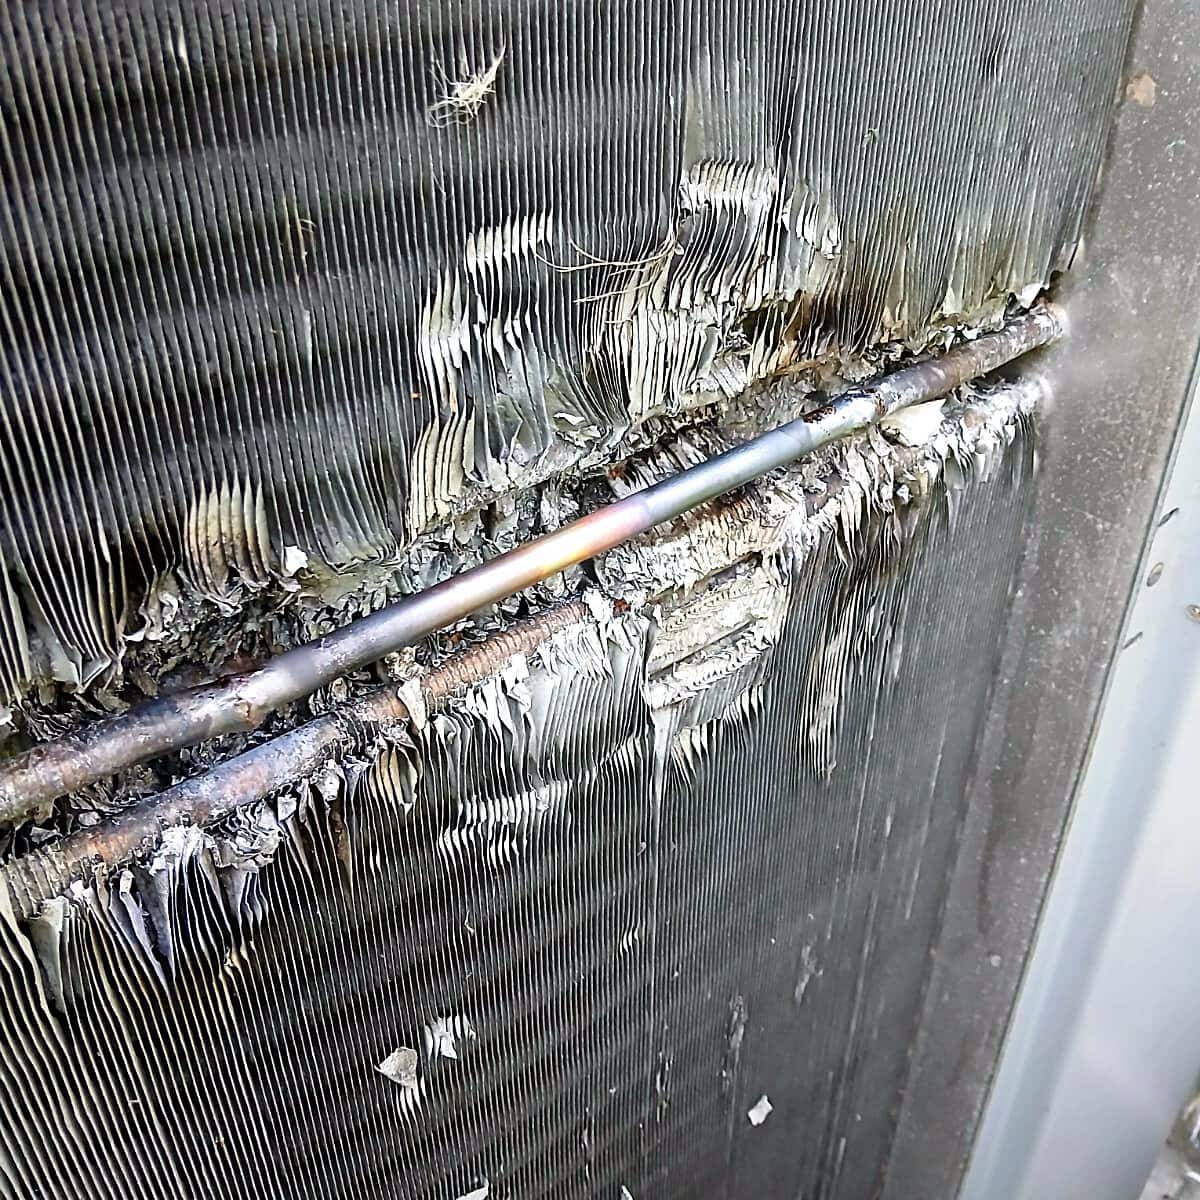
On our job, the nitrogen test revealed gas escaping from a hole in the copper pipework of the condenser coil. The damage had been caused by a forklift impact.
Step 3: Repair the damage
How a leak is repaired depends on where it is. A leaking valve or fitting may simply need replacing. Damage to pipework or a coil is usually repaired by brazing, ideally with nitrogen flowing through the pipe so no oxide scale forms inside.
For the damaged condenser coil, our engineer cut back the aluminium fins to reach the pipe, removed the damaged section of copper and brazed in a new section of 3/8″ pipe.
Step 4: Prove the repair with a standing pressure test
A repair is not finished until it is proven. The circuit is pressurised with nitrogen again and left to stand, with the pressure monitored for any drop. On the Liverpool chiller, the circuit was left under pressure for 24 hours and held with no drop at all, confirming the coil was leak-tight.
Step 5: Evacuate, recharge and record
Once the repair is proven, the nitrogen is released and the circuit is evacuated with a vacuum pump to remove air and moisture. It is then recharged with the correct weight of refrigerant. Any faulty components found along the way are best replaced at this stage; on our job, a failed high-pressure transducer was identified so it could be changed at the same time as the recharge.
Finally, the leak, the repair and the refrigerant added are recorded in the F-Gas records, and the system must be leak checked again within a month to confirm the repair has worked.
Can a damaged chiller condenser coil be repaired?
Often, yes, and it can make a big difference. A replacement condenser coil for a chiller the size of the one in our example would cost in excess of £10,000. Where the damage is in one place, as with an impact, a local repair like the one above is usually the quickest way back to full capacity, and keeps the original coil in service. Where a coil has widespread corrosion or repeated leaks, replacing it may be the better long-term option. An experienced engineer can tell you which makes sense for your plant.
Common causes of chiller leaks
- Vibration: over time, vibration can fatigue pipework and joints until they crack.
- Corrosion: coils exposed to harsh or coastal atmospheres can corrode through.
- Impact damage: chillers in yards and loading areas are easily hit by forklifts and other vehicles.
- Missing or worn valve caps: service valves rely on their caps as a second seal.
- Poor workmanship: badly made joints can leak years after installation.
How to reduce the risk of chiller leaks
- Have regular leak checks carried out as part of a planned maintenance contract, at least as often as F-Gas rules require.
- Fit impact protection around chillers in areas with vehicle traffic.
- Make sure service valve caps are always refitted.
- Keep coils clean, so damage and corrosion are easy to spot.
- Consider fixed leak detection, which is a legal requirement on systems holding 500 tonnes CO2 equivalent or more.
Need a chiller leak found and repaired?
Refrigerant leak repair must be carried out by F-Gas certified engineers working for a certified company. ICE provides chiller leak detection, chiller repair and chiller PPM contracts for manufacturers across Liverpool, Merseyside and the North West from our base in Runcorn. Call us on 01928 568800, or read how our chiller PPM found this leak in the first place.
You may also like...
How long should an air conditioning system run each day?
Air conditioners are designed for extended use but running them unnecessarily not only increases energy consumption, but it can also...
Read More
What are the latest F-Gas Regulations?
The F-gas regulations has had purposed changes almost a year ago. On April 5th 2022, the European Commission made a...
Read More
What are the legal requirements for air conditioning servicing in the UK?
To get the most out of your air conditioning system, you need to ensure that it’s working as efficiently as...
Read More
Which time of year is best for air conditioning maintenance
To ensure your air conditioning system is working as effectively and efficiently as possible, it’s essential that it is regularly...
Read More
Can a dirty filter cause an AC not to cool?
When an air conditioner filter gets dirty or clogged up, it can make your AC system less efficient. This, in...
Read More